Using Tailwind CSS with Yew (WebAssembly Framework for Rust) and Trunk
I’m playing a bit more with WebAssembly nowadays using Rust and Yew framework. I streamed my first experience with the framework a couple of years back, but I haven’t had a chance to touch it since, even though my experience was quite positive.
Anyhow, this time I decided to try it out together with my new favorite way of writing CSS: Tailwind. Tailwind is now the default option for writing CSS in Phoenix, and Phoenix has a native integration with it. I decided to setup something similar in style - Tailwind CLI running automatically during development + code completion in VS Code for Rust projects using Tailwind. To my delight, it turned out to be a rather straightforward affair, but I hope that writing the steps down can save somebody a bit of googling :)
We’ll be using Trunk to bundle & serve the Yew app, as is the recommended way according to the Yew documentation. I assume that you already have a Yew project, if not - follow the instructions to generate it.
Step 1: Install Tailwind CLI
First of, you’ll need to install the Tailwind CLI: you can either use Node.js or you can use a standalone binary.
I choose the latter, since it only takes a couple of commands and doesn’t rely on a JS ecosystem (thinking about it, I don’t even have Node installation anymore on any of my computers, lol).
# you'll need to choose the release name appropriate for your OS, you can see the release binary names here:
# https://github.com/tailwindlabs/tailwindcss/releases/latest

curl -sLO https://github.com/tailwindlabs/tailwindcss/releases/latest/download/tailwindcss-linux-x64
mv tailwindcss-linux-x64 tailwindcss
chmod +x tailwindcss
You may want to move the tailwindcss executable somewhere on your PATH. I have a ~/tools folder
on my desktop where all standalone CLI executables I use are placed, so I just moved it there.
Step 2: Initialize & Update Tailwind Config in the Yew Project Folder
This is as simple as running tailwindcss init in the root of the Yew’s project folder.
The command will create a tailwind.config.js file.
To make Tailwind scan Rust files and generate appropriate styles, you should make sure that this file
looks like this (you only need to modify the content key):
module.exports = {
  content: [
    "index.html",
    "./src/*.rs"
  ],
  theme: {
    extend: {},
  },
  plugins: [],
}
tailwind.config.js file
Of course, you can add the bundled plugins, extend the default theme, etc. using this file too!
Step 3: Add input.css
You need to decide how the main CSS file with the Tailwind directives and (optionally) additional styles
will be named before and after Tailwind’s processing. I just named the input file input.css and
placed it in the root folder of the Yew project, next to the index.html file.
Place those directives in this input.css file:
@tailwind base;
@tailwind components;
@tailwind utilities;
input.css file
I decided that the final CSS file will be called app.css, so I added it to .gitignore to avoid
committing it.
Step 4: Configure a Trunk Hook to Compile CSS with Tailwind CLI
This is the crucial step to make auto-reload work. Create Trunk.toml file in the root
of your Yew project, and add this to it:
[[hooks]]
stage = "pre_build"
command = "tailwindcss"
command_arguments = ["-i", "input.css", "-o", "app.css"]
Trunk.toml file
Of course, you can modify the names of input.css and app.css however you’d like.
And with that, we’re done! You can now run trunk serve, and if you’ll add any Tailwind CSS classes
to the index.html or inside your Rust files that generate HTML (e.g., using html! macro), you should see this
when you save your modified file in the output of trunk serve:
2023-03-10T09:01:22.420461Z  INFO 📦 starting build
2023-03-10T09:01:22.421088Z  INFO spawning asset pipelines
2023-03-10T09:01:22.421122Z  INFO spawned hook tailwindcss command_arguments=["-i", "input.css", "-o", "app.css"]
2023-03-10T09:01:22.421140Z  INFO spawning hook stage=PreBuild command=tailwindcss
Rebuilding...
Done in 131ms.
2023-03-10T09:01:23.007712Z  INFO finished hook tailwindcss
2023-03-10T09:01:23.069754Z  INFO copying & hashing css path="app.css"
trunk serve logs
Step 5: (Optional) Configure VS Code
If you’re using VS Code, you can also configure it to provide auto-completion and other niceties when you work with Tailwind and it will work inside Rust files too.
You’ll need to install the
tailwindcss-intellisense extension first.
Then, just open the User Settings and search for tailwind include languages. You’ll see a property dictionary,
add rust as the Item and html as the Value.
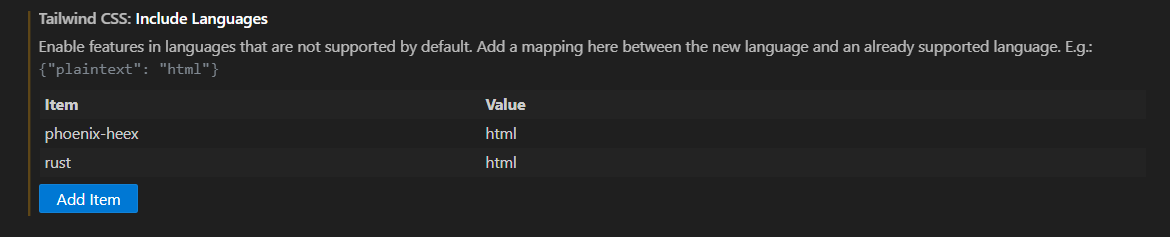 VS Code Tailwind “Included Languages” setting
Auto-completion should now work, and you can hover over the Tailwind classes to see what will be generated in the resulting CSS for them.
 Yew Code with Tailwind classes and auto-complete working
Happy coding!
If you enjoyed this content, you can sponsor me on Github to produce more videos / educational blog posts.
And if you're looking for consulting services, feel free to contact me .